Basic principles of sheet metal product design
The metal materials commonly used in hardware parts are stainless steel, copper, aluminum, zinc alloy, magnesium alloy, steel, iron, etc.
Hardware products are often divided into cold working and hot working according to different processing methods, and different types of metal forming methods are different. Cold working such as sheet metal materials are mainly formed by cold stamping, bending, drawing and other processes. Thermal processing, such as castings, is mainly made by melting metal raw materials into a liquid and casting with a mold.
It is generally believed that all sheet metal materials with uniform thickness are collectively called sheet metal. Commonly used sheet metal materials are stainless steel, galvanized steel, tinplate, copper, aluminum, iron, etc.

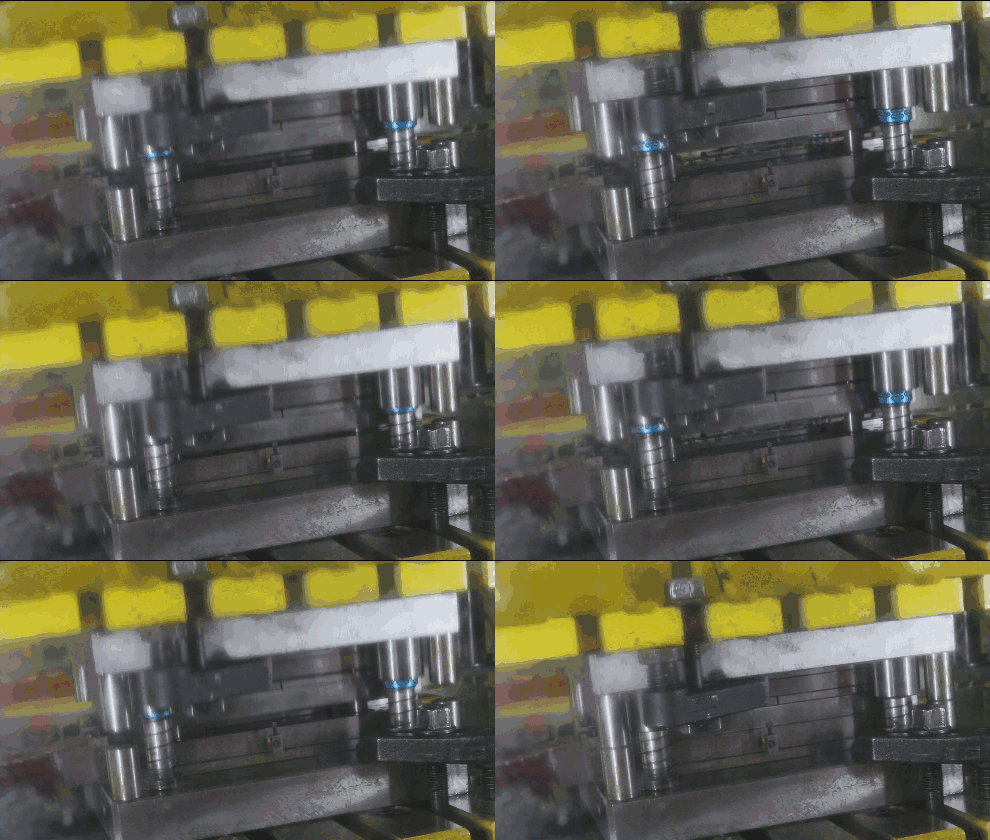
(The above dynamic picture is stamping)
1. Principle of uniform product thickness
Sheet metal is a material with a uniform thickness. Care should be taken when designing the structure. Especially in places with a lot of bends, it is easy to cause uneven thickness.
2. The principle of easy flattening
Sheet metal products are processed from sheet materials. Before processing, the raw materials are flat. Therefore, when designing sheet metal parts, all bends and inclined surfaces must be unfolded on the same plane and between There must be no interference. For example, the design of the sheet metal parts shown in Figure 1-1 is unsatisfactory because they interfere with each other after deployment.
(Fig.1-1 Sheet metal parts will interfere with each other after flattening)
3. Appropriate selection of sheet metal thickness
Sheet metal thicknesses range from 0.03 to 4.00mm in various specifications, but the larger the thickness, the more difficult it is to process, the greater the need for large processing equipment, and the defect rate increases. The thickness should be selected according to the actual function of the product. As long as the strength and function are satisfied, the thinner the better. For most products, the thickness of the sheet metal part should be controlled below 1.00mm.
4. In line with processing technology principles
Sheet metal products must conform to the processing technology and be easy to manufacture. Products that do not meet the processing technology cannot be manufactured, which is an unqualified design.
Process requirements for sheet metal product design
Sheet metal
Processability: the difficulty of the product in various processing processes such as punching, bending, etc.
Process requirements: When designing sheet metal products, these process characteristics should be met.
The basic processing methods are: punching, bending, stretching, forming, etc.
Common punching structure technology
Ordinary die-cutting: currently most used
Precision punching: precision punching dies and high-precision punching equipment are needed, the cost is higher than ordinary punching, and it is generally used for more precise products.
(1) The shape of the die-cutting parts is as simple as possible, avoiding slender cantilevers and slots
The depth and width of the protruding or recessed part of the die-cutting part should generally be not less than 1.5 / t (t is the thickness of the material), and at the same time, narrow slits and excessively narrow slits should be avoided to increase the mold The edge strength of the corresponding part is shown in Figure 1-2.
Figure 1-2 Avoid narrow cantilever and groove
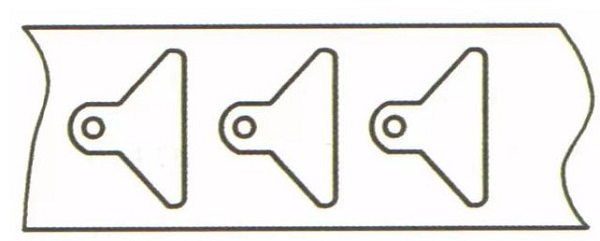
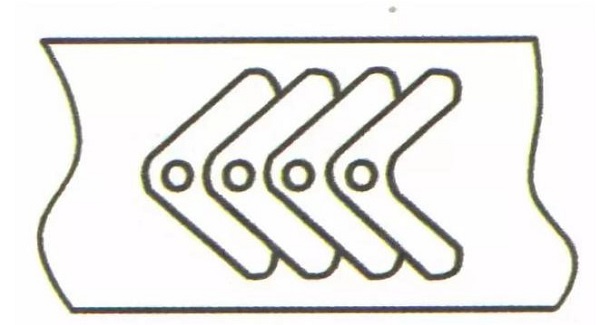
(2) The shape of the die-cutting part is minimized to minimize waste during layout, thereby reducing waste of raw materials
When the design shown in Figure 1-3 is improved to the design shown in Figure 1-4, the number of products will be increased with the same raw materials, thereby reducing waste and reducing costs.
Figure 1-3 Original design
Figure 1-4 Improved design
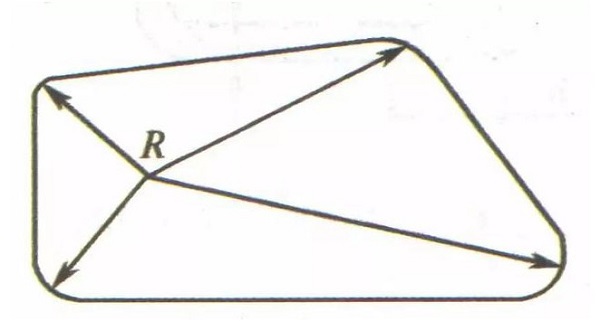
(3) Avoid sharp corners in the shape and inner holes of the punched parts.
The sharp corners will affect the life of the mold. When designing the product, pay attention to the fillet transition at the corner connection. The corner radius R ≥ 0.5t (t is the material thickness), as shown in Figure 1-5.
Figure 1-5 Rounded design
(4) Holes and square holes for punching parts
The hole of the punching part is preferably a round hole. When punching, it is limited by the strength of the punch. The diameter of the punch must not be too small, otherwise it is easy to damage the punch. The minimum punching size is related to the shape of the hole, the mechanical properties of the material and the thickness of the material. Table 1-1 is the minimum punching size for commonly used materials, and t is the thickness of the sheet metal material.
Table 1-1 The smallest punching size of common materials
The minimum size of the punching hole is generally not less than 0.40mm. Holes smaller than 0.40mm are generally processed by other methods, such as corrosion and laser drilling.
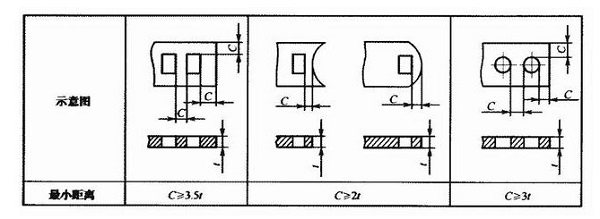
(5) Hole pitch and hole margin of punching.
In the design of the sheet metal structure, there should be enough materials between the hole and the hole, and between the hole and the margin, so as not to break during punching. Figure 1-6 shows the minimum hole spacing and the minimum hole margin, t is the thickness of the sheet metal material.
Figure 1-6 Schematic diagram of minimum hole spacing and minimum hole margin
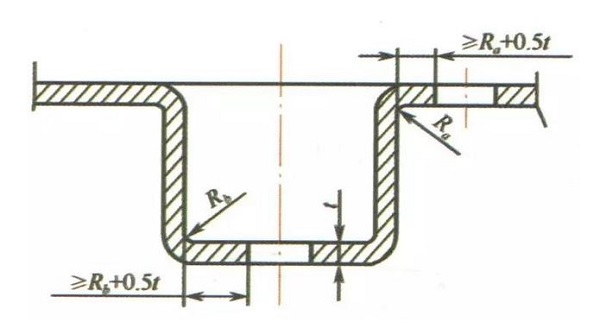
(6) When punching and bending parts and punching parts, a certain distance should be maintained between the hole wall and the straight wall.
When punching holes in stretched products, to ensure the shape and position accuracy of the holes, and to ensure the strength of the mold, a certain distance should be maintained between the hole walls and the straight walls, as shown in Figure 1-7.
Figure 1-7 Punching on stretched products
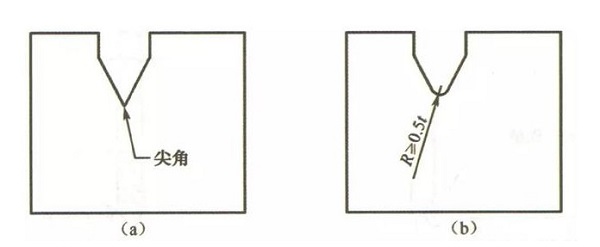
(7) When designing sheet metal parts, try to avoid the design of sharp corners.
The sharp corner of the notch will cause the die punch to be sharp, which will easily damage the punch, and cracks will also easily occur at the sharp corner of the product. The product shown in Figure 1-8 (a) has sharp corners, and Figure 1-8 (b) shows the sharp corner after rounding, and t is the thickness of the sheet metal material.
Figure 1-8 Treatment of sharp corners
Bend
The principle of bending: refers to making straight edges, hypotenuses, bends and other shapes on sheet metal parts, such as bending sheet metal parts into L-shape, U-shape, and V-shape.
Mold Bending: Generally used for sheet metal products with complex shapes, small sizes and high output.
Bending machine bending: Generally used for sheet metal products with large product dimensions and small batch production.
(1) Minimum bending radius of sheet metal bending parts
When the material is bent, the outer layer is stretched and the inner layer is compressed in the fillet area. When the thickness of the material is constant, the smaller the inner fillet, the more severe the material will be in tension and compression; when the tensile stress of the outer fillet exceeds the material's ultimate strength, cracks and breaks will occur; if the fillet is bent If it is too large, it will be affected by the rebound of the material, and the accuracy and shape of the product cannot be guaranteed. Refer to Table 1-2 for the minimum bending radius of the designed bending parts.
Table 1-2 Minimum bending radius of common materials
(2) Height of straight edge of curved part
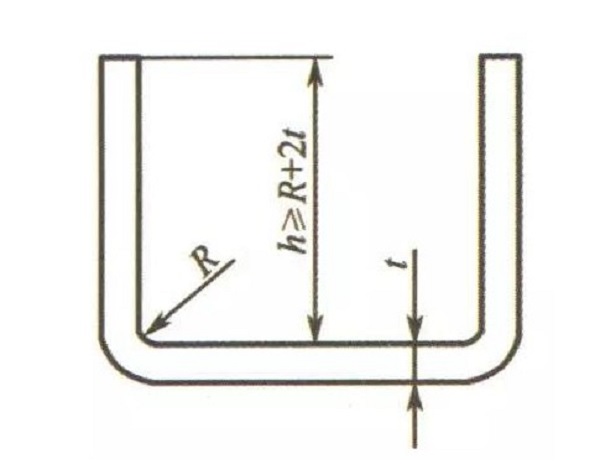
The height of the straight edge of the bent part must not be too small, otherwise it is difficult to meet the precision requirements of the product. In general, the minimum straight edge height is designed according to the requirements shown in Figure 1-9.
Figure 1-9 Minimum straight edge height design
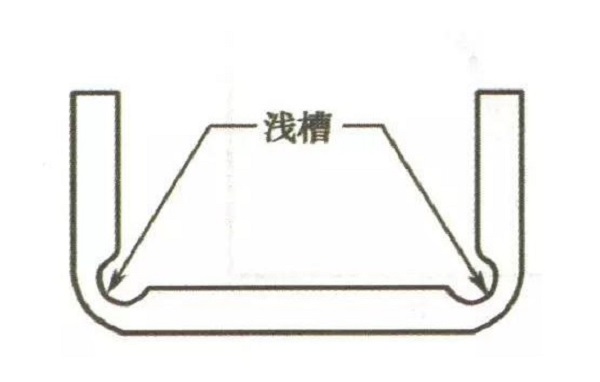
If the height of the straight edge of the curved part is less than the minimum straight edge height because of the product structure, you can process the shallow groove in the bending deformation area before bending, as shown in Figure 1-10. The disadvantage of this method is that the strength of the product is reduced, and it is not applicable if the sheet metal material is too thin.
Figure 1-10
(3) The minimum hole margin of the bent part.
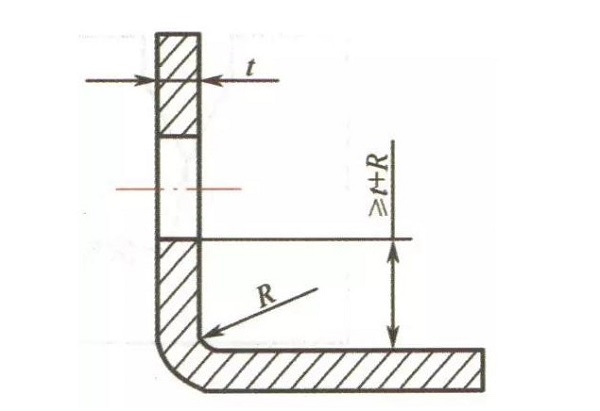
There are two methods of hole processing on bent parts, one is to bend first and then punch; the other is to punch first and then bend. The design of the punching margin after bending first refers to the requirements of the punching part; the punching after bending should leave the hole outside the deformed area of the bend, otherwise it will cause the deformation of the hole and the opening is easy to crack. The basic design The requirements are shown in Figure 1-11.
Figure 1-11 Minimum hole margin of bent parts
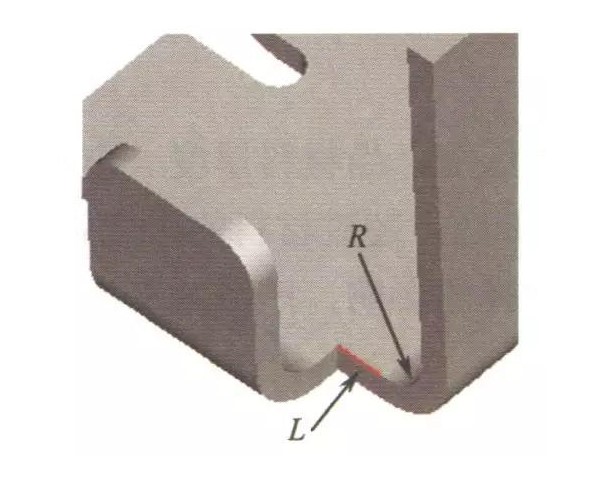
(4) When the adjacent edge is close to the rounded edge of the bend, the bent edge should keep a certain distance from the rounded corner, as shown in Figure 1-12, the distance L ≥ 0.5t, where t is the sheet metal thickness.
Figure 1-12
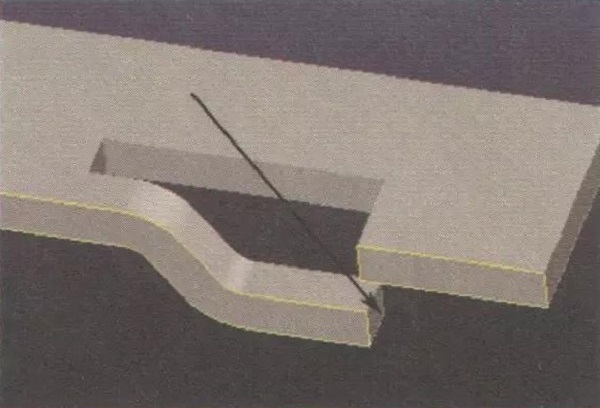
(5) Process notch design for curved parts
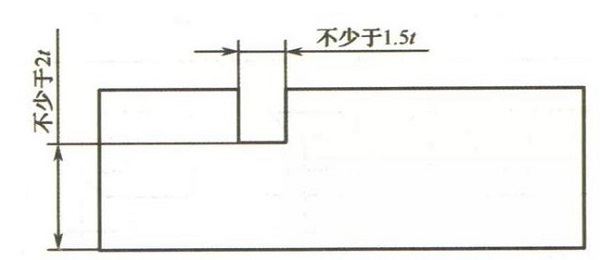
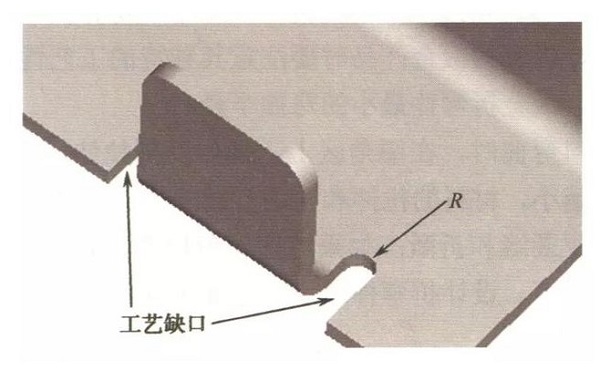
If only one part of an edge is bent, in order to prevent cracking and deformity, a process cut should be designed. The width of the process cut should not be less than 1.5t, and the depth of the process notch should be not less than 2.0t + R, where t is the sheet metal thickness, as shown in Figure 1- 13 shown.
Figure 1-13 Process gap design
(6) The design of the dead side of the bent piece.
The cut-off edge of the bending piece refers to the side where the bend is parallel to the bottom surface. The front process of hitting the dead side is to bend the bent side into a certain angle, and then hit the fit.
The length of the dead side of the dead side is related to the thickness of the material. Generally, the minimum length of the dead side is L≥3.5t + R, where t is the thickness of the sheet metal material, and R is the minimum inner bending radius of the previous process of the dead side. 1-14.
Figure 1-14 Length design of the dead side
(7) Craft hole design of curved parts
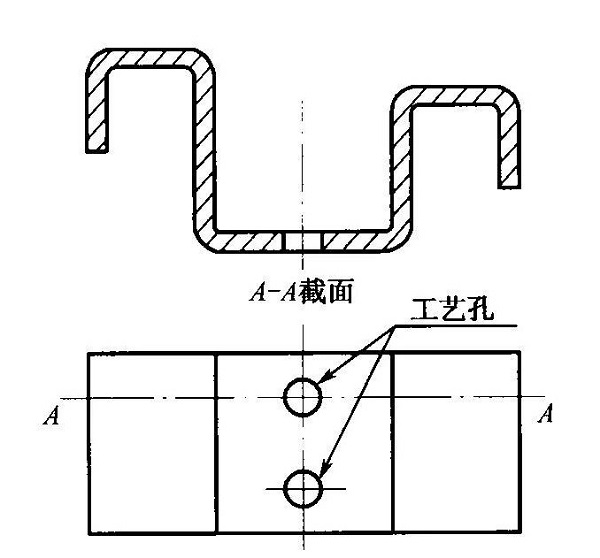
When designing U-shaped curved parts, the two curved sides should be the same length to avoid product displacement during bending. If the structural design does not allow the two sides to be the same length, in order to ensure accurate positioning of the product in the mold, it should be designed before Adding process positioning holes, especially parts that have been bent for many times, must be designed with process holes as the positioning reference to reduce cumulative errors and ensure product quality, as shown in Figure 1-15.
Figure 1-15 Process hole design of curved parts
Stretch
I. Definition
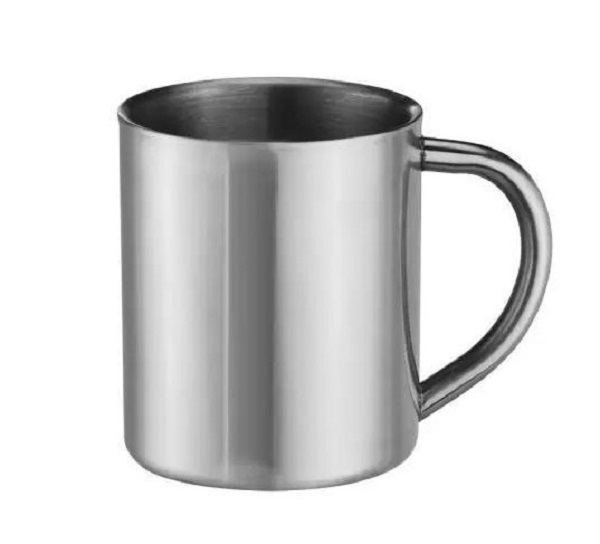
Sheet metal drawing: The process of drawing sheet metal into deep circles, squares, and other shapes with side walls, such as aluminum washbasins and stainless steel cups.
Matters needing attention for sheet metal stretching
(1) The minimum fillet radius between the bottom and the wall of the tensile part should be greater than the thickness of the plate, that is, r1> t; in order to make the stretch more smoothly, generally take r1 = (3 ~ 5) t, the maximum fillet The radius should be less than 8 times the plate thickness, that is r1 <8t.
The requirements for the corner radius of the drawn parts are shown in the table
Drawing corner radius
(2) The minimum fillet radius between the flange and the wall of the tensile member should be greater than 2 times the thickness of the plate, that is, r2> 2t; in order to make the stretch more smoothly, generally take r2 = 5t, the maximum fillet radius Less than 8 times the thickness of the board, that is r1 <8t. (Eg Figure 1-16)
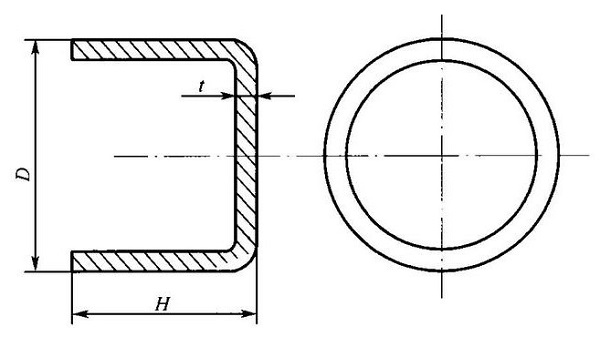
Figure 1-16 Dimensional relationship between height and diameter in a round molding
(3) The minimum fillet radius between two adjacent walls of a rectangular stretcher should be r3≥3t. In order to reduce the number of stretches, r3≥1 / 5H is taken as far as possible so that one stretch can be completed.
(4) Due to the different stresses in the stretched parts, the thickness of the material changes after stretching. Generally, the bottom center maintains the original thickness, the material at the bottom rounded corners becomes thinner, and the top near the flanges becomes thicker; the rectangular stretched parts around the corners become thicker. When designing stretched products, clearly indicate on the drawings that the external dimensions or internal and external dimensions must be guaranteed, and the internal and external dimensions cannot be marked at the same time.
(5) In general, the thickness of the material of the tensile part is considered to be the rule that the upper and lower wall thicknesses are not equal in the process deformation (that is, the upper thickness and the lower thickness). When the round flangeless stretch piece is formed at one time, the ratio of the height H to the diameter D should be less than or equal to 0.4.
In general, when designing a stretched part, pay attention to the shape of the stretched part should be as simple as possible, the shape should be as symmetrical as possible, and the stretching depth should not be too large.

